First, lets see the little steppers in action! Our main character, StepperBot, is “instructed” to move in a square path on my coffee table, making 90 degree turns at the corners. Turning exactly at the right time and by the right angle is critical avoid falling off and crashing on the floor in an embarrassing pile of messy wires.
The robot has no sensors for positioning, orientation, or a way to detect the edges of the table. Movement is controlled only by the number of pre-defined steps in each direction hard-coded in the sketch. The motors are running at approximately 8 volts DC and 15 RPM in this example. One thing that you cannot tell from the video is how quiet these little steppers run: StepperBot is very stealthy! Eventually, small errors add up over time and the bot falls off the table, but it typically runs for 10-15 minutes, before that: good enough for me!
What is so special about steppers
A stepper motor can move in accurate, fixed angle increments known as steps. For practical purposes, a stepper motor is a bit like a servo: you can tell it to move to a pre-defined position and can count on getting fairly consistent results with multiple repetitions. Servos though, are usually limited to a 0-180 degree range, while a stepper motor can rotate continuously, similar to a regular DC motor. The advantage of steppers over DC motors is that you can achieve much higher precision and control over the movement. The downside of using steppers is that they are a bit more complex to control than servos and DC motors.
The 28BYJ-48 Stepper Motor Datasheet
The 28BYJ-48 is a small, cheap, 5 volt geared stepping motors. These stepping motors are apparently widely used to control things like automated blinds, A/C units and are mass produced.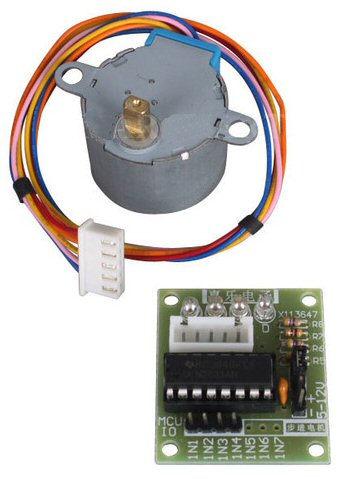 Due to the gear reduction ratio of approximately 64:1 it offers decent torque for its size at speeds of about 15 rotations per minute (RPM). With some software “trickery” to accelerate gradually and a higher voltage power source (I tested them with 12 volts DC) I was able to get about 25+ RPM. These little steppers can be purchased together with a small breakout board for the Arduino compatible ULN2003 stepper motor driver for less than $5. Quite a bargain, compared to the price of a geared DC motor, a DC motor controller and a wheel encoder! The low cost and small size makes the 28BYJ-48 an ideal option for small robotic applications, and an excellent introduction to stepper motor control with Arduino. Here are the detailed specs of the 28BYJ-48 stepper motor.
| Motor Type |
| Connection Type |
| Voltage |
| Frequency |
| Step mode |
| Step angle |
| Gear ratio |
| Wiring to the ULN2003 controller |
| Weight |
The motor has 4 coils of wire that are powered in a sequence to make the magnetic motor shaft spin. When using the full-step method, 2 of the 4 coils are powered at each step. The default stepper library that comes pre-installed with the Arduino IDE uses this method. The 28BYH-48 datasheet specifies that the preferred method for driving this stepper is using the half-step method, where we first power coil 1 only, then coil 1 and 2 together, then coil 2 only and so on…With 4 coils, this means 8 different signals, like in the table below.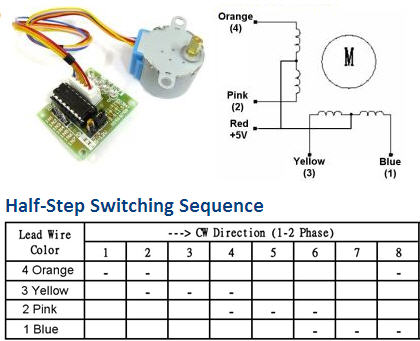
Wiring the ULN2003 stepper motor driver to Arduino Uno
The ULN2003 stepper motor driver board allows you to easily control the 28BYJ-48 stepper motor from a microcontroller, like the Arduino Uno. One side of the board side has a 5 wire socket where the cable from the stepper motor hooks up and 4 LEDs to indicate which coil is currently powered. The motor cable only goes in one way, which always helps.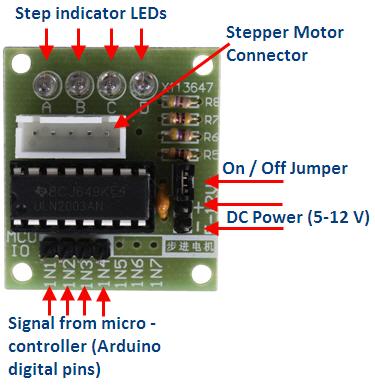 On the side you have a motor on / off jumper (keep it on to enable power to the stepper). The two pins below the 4 resistors, is where you provide power to the stepper. Note that powering the stepper from the 5 V rail of the Arduino is not recommended. A separate 5-12 V 1 Amp power supply or battery pack should be used, as the motor may drain more current than the microcontroller can handle and could potentially damage it. In the middle of the board we have the ULN2003 chip. At the bottom are the 4 control inputs that should be connected to four Arduino digital pins.
Hooking it up to the Arduino
Connect the ULN2003 driver IN1, IN2, IN3 and IN4 to digital pin 3, 4, 5 and 6 respectively on the Arduino Uno. Connect the positive lead from a decent 5-12V battery pack to the “+” pin of the ULN2003 driver and the ground to the “-” pin. Make sure that the “on/off” jumper next to the “-” pin is on. If you power the Arduino from a different battery pack, connect the grounds together.
Arduino stepper code and the AccelStepper library
The default stepper library that comes pre-installed with the Arduino IDE supports the full-step method only and has limited features. It does not run the 28BYJ-48 motors very efficiently and getting two of them running at the same time for a differential drive robot is a bit more difficult. I came across example sketch by 4tronix that used the half-step method with no additional libraries. Their code worked well and I was able to modify it, so that I can run two steppers at the same time. Still, I was only able to get my stepper motor spinning fairly slow and it was getting quite warm, for some reason. Additionally, that sample code uses delays for the steps and that will cause some issues when we start adding more complex functions in the loop and hook up various sensors. Then I came across the AccelStepper library. It runs the 28BYJ-48 steppers very efficiently (they never go as hot as with the other options I tried) and also supports acceleration (which allows the stepper to get to a higher speed). The library uses non blocking code for the steps and has quite a few other nice features. After some messing around with the documentation and the examples I got everything up and running. Below is the code that will slowly accelerate the 28BYJ-48 in one direction, then decelerate to a stop and accelerate in the opposite direction. Naturally, make sure you download and install the AccelStepper library first!
#include <AccelStepper.h>
#define HALFSTEP 8

// Motor pin definitions
#define motorPin1  3     // IN1 on the ULN2003 driver 1
#define motorPin2  4     // IN2 on the ULN2003 driver 1
#define motorPin3  5     // IN3 on the ULN2003 driver 1
#define motorPin4  6     // IN4 on the ULN2003 driver 1

// Initialize with pin sequence IN1-IN3-IN2-IN4 for using the AccelStepper with 28BYJ-48
AccelStepper stepper1(HALFSTEP, motorPin1, motorPin3, motorPin2, motorPin4);

void setup() {
  stepper1.setMaxSpeed(1000.0);
  stepper1.setAcceleration(100.0);
  stepper1.setSpeed(200);
  stepper1.moveTo(20000);

}//--(end setup )---

void loop() {

  //Change direction when the stepper reaches the target position
  if (stepper1.distanceToGo() == 0) {
    stepper1.moveTo(-stepper1.currentPosition());
  }
  stepper1.run();
}
The code above will not push this motor to its limit. You can experiment with the acceleration and speed settings to see what is the best you can squeeze out. Note that for nigher speeds, you will likely need a higher voltage DC source. If you got your stepper running, here is the code that the StepperBot from the video above is running. You will need to adjust the speed, as well as the “turnSteps” and “lineSteps” variables based on your base and wheel sizes, if you want to have your bot moving in a square path.
#include <AccelStepper.h>
#define HALFSTEP 8

// motor pins
#define motorPin1  3     // IN1 on the ULN2003 driver 1
#define motorPin2  4     // IN2 on the ULN2003 driver 1
#define motorPin3  5     // IN3 on the ULN2003 driver 1
#define motorPin4  6     // IN4 on the ULN2003 driver 1

#define motorPin5  8     // IN1 on the ULN2003 driver 2
#define motorPin6  9     // IN2 on the ULN2003 driver 2
#define motorPin7  10    // IN3 on the ULN2003 driver 2
#define motorPin8  11    // IN4 on the ULN2003 driver 2

// Initialize with pin sequence IN1-IN3-IN2-IN4 for using the AccelStepper with 28BYJ-48
AccelStepper stepper1(HALFSTEP, motorPin1, motorPin3, motorPin2, motorPin4);
AccelStepper stepper2(HALFSTEP, motorPin5, motorPin7, motorPin6, motorPin8);

// variables
int turnSteps = 2100; // number of steps for a 90 degree turn
int lineSteps = -6600; //number of steps to drive straight
int stepperSpeed = 1000; //speed of the stepper (steps per second)
int steps1 = 0; // keep track of the step count for motor 1
int steps2 = 0; // keep track of the step count for motor 2

boolean turn1 = false; //keep track if we are turning or going straight next
boolean turn2 = false; //keep track if we are turning or going straight next

void setup() {
  delay(3000); //sime time to put the robot down after swithing it on

  stepper1.setMaxSpeed(2000.0);
  stepper1.move(1);  // I found this necessary
  stepper1.setSpeed(stepperSpeed);

  stepper2.setMaxSpeed(2000.0);
  stepper2.move(-1);  // I found this necessary
  stepper2.setSpeed(stepperSpeed);

}
void loop() {

  if (steps1 == 0) {
    int target = 0;
    if (turn1 == true) {
      target = turnSteps;
    }

    else {
      target = lineSteps;
    }

    stepper1.move(target);
    stepper1.setSpeed(stepperSpeed);
    turn1 = !turn1;
  }

  if (steps2 == 0) {
    int target = 0;
    if (turn2 == true) {
      target = turnSteps;
    }

    else {
      target = -lineSteps;
    }

    stepper2.move(target);
    stepper2.setSpeed(stepperSpeed);
    turn2 = !turn2;
  }

  steps1 = stepper1.distanceToGo();
  steps2 = stepper2.distanceToGo();

  stepper1.runSpeedToPosition();
  stepper2.runSpeedToPosition();
}
Comments
Comment by Wagner on 2014-03-02 13:06:18 -0700
Excellent post! I really see 42bots becoming a great source for the community!
Comment by nico on 2014-04-17 16:42:45 -0700
I can’t download the library, it’s a zip file or something like this?
Comment by Stan on 2014-04-17 21:42:56 -0700
Yes, the direct link is on the page I posted above. Here it is as well:
http://www.airspayce.com/mikem/arduino/AccelStepper/AccelStepper-1.39.zip
Comment by Vatur on 2014-04-19 21:35:39 -0700
Great Stan I want the chassis of your Robot How can i get it 🙂
Comment by Stan on 2014-04-22 23:19:18 -0700
Hi Vatur, the files are here: https://github.com/42Bots/StepperBot
Note that this is a prototype and the wheels are a bit of a tight fit on the motor shaft.
Stan
Comment by Ted on 2014-07-25 15:56:26 -0700
‘accel stepper does not name a type ‘ is the msg I get with the listed last two sketches .
How can I fix ?
Comment by Ryan on 2014-07-26 16:48:24 -0700
Very cool thanks for posting this. I just recently received 2 off these stepper motors from amazon and was looking for more information on them. I am going to try and drive them with the AdaFruit motor shield instead of the little circuit boards that came with them.
Thanks
-=Ryan
Comment by Stan on 2014-07-28 10:23:44 -0700
Hi Ted, I just noticed that the code formatting plug in bothced the flirst line of the sketch with the include statetement. Please try again with the code now.
Comment by Tom on 2014-08-30 08:45:26 -0700
Hi Stan, the first example has been incredibly useful to me. But is there any way to turn it into blocking code? I need to turn the motor and the press of a button and it won’t work at the moment because it’s not blocking code.
Cheers,
Tom
Comment by Stan on 2014-08-31 10:32:23 -0700
Hi Tom, I am glad the article helped you. I am not sure exactly what your application is, but I understand you need to run the motors only when some condition is met (related to a button press). I would add some code to the loop that will set a variable, when you press (or depress) the button. Then you check the variable, and only execute the stepper code from the example, when your condition is met.
Comment by Ted on 2014-09-01 15:58:17 -0700
I’m still getting the same msg for both sketches.:shruggs:
Comment by Stan on 2014-09-03 07:53:42 -0700
Ted, could you double-check that you have the AccelStepper library installed correctly? That is all I can think of right now…
Comment by Ted on 2014-09-05 14:31:24 -0700
Hi,
I may not have it installed at all, I think I just copied the code posted, not sure how or where to go for the accel library installation.
I’ll have to look back at what it was I actually did….
Comment by James on 2014-10-14 23:33:28 -0700
Hi, I too have been working with these model stepper motors and arduino but after a couple of months of trying I have not been able to get good results. It seems to work best at runSpeed(1000) when spinning clockwise and is high torque and silent (the holy grail!) but they often skip or jitter when starting or changing direction so I’ve not found them useful for my robot application. I’ve tried tweaking speed and playing with acceleration settings but I wonder if you’ve had better results? I tried your code but had the same issues (they only run as intended 80% of the time). Any suggestions would be welcome. At present, I’m trying other motors but they are too noisy and have vibration problems. These guys would be perfect if I could get them to work reliably.
Comment by Stan on 2014-10-15 08:26:46 -0700
Hi James, I have similar observations. I guess you can’t expect perfection from a $2 dollar stepper motor, shipping included…I find that if you increase the voltage to about 8-12 volts and play with the acceleration settings you can get acceptable results for hobby applications. Also, some units are better quality than others. If you open one up you will see the tiny plastic gears. Easy for them to get misaligned, if you put too much pressure on the shaft. I would definitely not recommend them for any applications, where accuracy and consistency are critical, but as a learning tool for a hobbyist, you can’t beat the price!
Comment by Mikey on 2014-11-10 06:50:56 -0700
First, thank you. This got me started with my stepper motor.
I wrote (modified your first example) a sketch to step +2048, -2048, etc. (about a 360 degree turn of the motor, back and forth). Why is it that the first turn only goes half way? After that first half turn it happily twists back and forth almost exactly 1 revolution. Why only half the first time? I tried this with 180 degress (step=1024) and got the same result, first turn was only 90 degrees.
Comment by Mihai on 2014-11-23 03:57:10 -0700
Best stepper motor tutorial ever! I wanted to learn to use a stepper and I found out everything I needed right here. Thanks!
Comment by Margi on 2014-12-03 00:06:46 -0700
Hello,
I was looking at the first code for the arduino and I was wondering if you can get the code to run only once rather than in an infinite loop. I tried just doing a for loop and it didn’t work. Thanks!
Comment by sam on 2014-12-06 08:01:23 -0700
so my left motor wont budge, would that be my programing, wiring or just a bad motor?
Comment by Erick Garcia on 2014-12-10 12:07:02 -0700
Great tutorial! Helped me use my stepper motor within minutes. thanks! 😀
Comment by bob on 2014-12-25 16:21:41 -0700
thank you,
I know nothing about programing, do you have a program that well let me move the arduino through my keypad using the same motors? Just something that lets my move it around on command. sorry if this sounds a bit stupid, i am new to the arduino, but i did get your program to run.
Comment by Chris on 2014-12-29 12:43:32 -0700
Hi Stan,
you did a nice job figuring out parameters and using the AccelStepper library
Could you tell me, why the initialising sequence for pins is IN1-3-2-4.? My first guess woud be IN 1-2-3-4
Bye
Chris
Comment by Stan on 2014-12-29 23:01:48 -0700
Hi Chris, it is just the arrangement of the wires in the connector out of the ULN2003 and the connector of this particular motor. If the two coils are A and B, then you are supposed to initialize them like this: A1, A2, B1, B2 for AccelStepper. In the case of the 28BYJ-48 motor coil “A” would be IN1 and IN3, corresponding to the blue and yellow wires and coil “B” will be IN2 and IN4.
Comment by Derrick on 2015-01-11 02:24:43 -0700
Thanks for your great article. I love these motors – have been using them since my PICAXE days, but swapping to ARDUINO and using the Acccelstepper library has simplified their use even more – especially loved the acceleration feature. My use is purely hobby level, so not too fussed at occasional slippage problem, but they have good torque, a fair usable speed and with their equally cheap ULN 2003, I have over 20 sets just lying around for quick projects.
Cheers,
Derrick
Comment by Neil Kenyon on 2015-01-19 10:27:26 -0700
Stan – many thanks for a fantastic tutorial!
You explained everything and provided all the references. Great Job!
You set me on the right track to using my 28BYJ-48 with an Arduino and the AcceStepper library. I will be referencing your post in my own blog.
Neil
Comment by Gilles Prescott on 2015-02-26 11:56:46 -0700
Hi Stan,
I wanted to use 4 of the 28BYJ-4 (with the ULN2003 Controller) to drive my robot platform. ( http://www.amazon.com/Emgreat-4-wheel-Chassis-Encoder-Arduino/dp/B00GSIRHEU/ref=pd_sim_t_2?ie=UTF8&refRID=0EHCVAMYZMW25NK7FMKR ).
Would it be as simple as multiplying your code X 2 or do you see it as more complex. Before I get too deep in this to find out later it’s hardly doable I decided to ask for your opinion first.
I am thinking of sending a pulse to both left wheels then to the right wheels. Programming turns may be a bit difficult.
What do you think based on your experience.
thanks in advance.
Gilles
Comment by Stan on 2015-02-26 19:49:40 -0700
Hi Gilles, I have not tried running four steppers at the same time, but I see no reason why the last example can’t be scaled to accommodate that. Obviously, the code moves the stepper one at a time, so it is not ideal if you need very high precision and coordination. You likely will not use $4 dollar motors, if that was the case anyway. Good luck and post back your results, if you don’t mind…
Comment by zaza on 2015-03-02 11:51:24 -0700
hello, i cannot connect these drivers to CNC TB6560. is it this available?
Comment by Kevin on 2015-03-21 03:19:29 -0700
Hi Tom,
Just came across your thread while exploring the Accel Library. If it is just one motor turning at a time you can use the runToNewPosition function.
Cheers,
Kev
Comment by r.a. Nagy on 2015-04-26 04:53:55 -0700
One of the very best articles ever written. Thank you!
Comment by wildha on 2015-05-27 05:02:29 -0700
Hello, i want to ask. Can this code be used to avoid obstacle? Or I have to modify the code? I’m sorry, I’m an amateur about robotic. Hehehe. Do you mind to reply to my email? I want to ask some questions if you don’t mind. Thank you so much 🙂
Comment by zattar on 2015-06-10 03:24:43 -0700
i want to know too. did u get any reply?
Comment by Brandon on 2015-10-03 21:05:00 -0700
i have a question. that driver is only for the 5 wires stepper motor
what if I use 4 wires stepper motor for that driver.. how to I connect? or Does it impossible?
Thank yoiu
Comment by Stan on 2015-10-06 22:23:12 -0700
Hi Brandon, you would need a different motor driver for a 4 wire (bi-polar) stepper motor. See this for more info: http://42bots.com/tutorials/bipolar-stepper-motor-control-with-arduino-and-an-h-bridge/
Comment by Husebot on 2015-10-27 09:52:14 -0700
Hi,
Thank you for this great tutorial! I have the question, if you have an overview for all commands of the library and what they do.
Thank you!
Comment by MatijaZ on 2015-12-07 08:12:27 -0700
Finally a realy comprehesice tutorial about stepper motors. Got it through Github. Too bad you are not somewhere higher direct in Google with it. Looking for such tutorila fow a while now, but always through Google. Thanks for sharing, Matija
Comment by Martyn on 2016-01-31 13:25:06 -0700
I have what looks like exactly the same motor and board but my “+” is not connected to anything else on the board. I have to connect 5v to both the 2 (normally) jumpered pins before anything happens. Do you think this is just a bad copy I have, maybe?
Comment by Mark Collins on 2016-02-18 01:41:36 -0700
Why do you say that the gear ratio is *approximately* 64:1? I counted the teeth on the gears, and it’s exactly 64:1
gear on motor shaft has 9 teeth.
there are three reduction gears, with 32/11 teeth, 22/9 teeth, 27/8 teeth. The gear connected to the external shaft has 24 teeth. The external shaft has eight teeth. This gives a reduction ratio of 1/9 * 32/11 * 22/9 * 27/8 * 24 / 8 * 8, which is exactly equal to 64.
Where does that weird 63.68395 number come from?
Comment by Stan on 2016-02-18 22:47:03 -0700
This link that is referenced in the post as well. It seems that there are several versions of this motor, so you got “lucky”.
Comment by marcus on 2016-05-30 01:21:40 -0700
Hi, great article. Can these ULN2003 Driver Boards drive a non-steppe motor ? I have few mini motors and I was wondering if they’d be any good for them ? I just built a larger robot using some L298N motor shields and they are pretty unreliable, I was wondering if I could swap them out and use these little ULN2003 Driver Boards
Comment by Paul Gibbons on 2016-06-17 06:30:51 -0700
To use HALFSTEP make sure you sue the version of AccelStepper from http://www.airspayce.com/mikem/arduino/AccelStepper/index.html ( http://www.airspayce.com/mikem/arduino/AccelStepper/AccelStepper-1.51.zip) rather version 1.3 from github.
Comment by Pat on 2016-08-21 18:37:55 -0700
i installed your first code along with the Accel Stepper.h but get a compile error as the following 3 lines.
as: unrecognized option ‘-mmcu=avr5’
exit status 1
Error compiling.
What am I doing wrong?
thank-you
Comment by Andrea on 2016-10-26 02:35:18 -0700
I would like to know what type of small errors sum up bringing the robot to fall off the table: are they related to the rotations (not exactly 90 degrees) or to the distances in straight line (I mean between one rotation and another)?
Thanks for the help.
Comment by imakerobots on 2016-10-26 20:03:29 -0700
Hi Andrea, many small errors add up: differences in the friction of the two wheels, small misalignment in the motors, skipped steps. In order to get better accuracy you will need what is called a closed loop system, where you have an independent way to measure the distance traveled with, for example, a wheel encoder.
Comment by Trisna Wijaya on 2016-11-13 07:35:31 -0700
Sorry,I am newbie, I would like to add for 2 sensor using IR sensor for following line, could you give me solution. Many Thank
Comment by Javier on 2017-01-23 17:26:40 -0700
Hello Stan,
Great article. I have a question though. You mentioned that the source Voltage can be 5-12 V.
I don’t think you can use a 12V power supply on a 5V motor without risking to overheat or even damaging the coils unless you limit the current to about 165mA per coil and I believe the driver does not have this feature. How do you limit the current in your application to avoid damages to the motor?
Thanks,
Javier
Comment by adanan azeem on 2017-03-04 00:08:23 -0700
Arduino: 1.8.0 (Windows 8.1), Board: “Arduino/Genuino Uno”
G:\abc123\abc123.ino:6:26: fatal error: AccelStepper.h: No such file or directory
#include
^
compilation terminated.
exit status 1
Error compiling for board Arduino/Genuino Uno.
This report would have more information with
“Show verbose output during compilation”
option enabled in File -> Preferences.
i face this error may you help me please
Comment by Rodion on 2017-05-03 09:33:21 -0700
It’s awesome! How did you accelerated 28BYJ-48 to 25+ RPM? What software “trickery” do you use to make it that fast?
I’m making CNC plotter for my graduation project and I need to speed it up to debug without pain.
Comment by Sia on 2017-05-04 16:12:28 -0700
Thank you. very helpful!
Comment by Rodion on 2017-05-23 04:53:24 -0700
I still don’t understand how you did it, Stan?
My motor has 4 RPM, that’s so awful truth for me! Why? Did I brought fake 28BYJ-48-5V motors (all four of them are tested)?
I’m using large acceleration (10000) via library to easily measure time that delayed since start of rotation, and in other way: to measure exact number of rotations made in 1 minute. Summarizing, AccelStepper’s speed of 1500 steps/sec and larger doesn’t change real speed of shaft, smaller library’s speed can make shaft’s speed low.
I have 4 real rotations per minute, but 14 seconds per one rotation – so as further I move, it goes slower?
Can you please help me?
Comment by SK on 2017-06-09 19:29:13 -0700
What would be the best way to use run(), runSpeed(), or runSpeedToPosition() from outside of the loop()?
I’m trying to use it with Blynk.
Comment by Danovan on 2017-08-09 02:38:31 -0700
hi! greetings from Indonesia,
thankyou so much for this article, can you tell me how i write arduino code , if i need to make some input then the motor can rotate for specified degree?
for example : ” case A : if input = 1 then rotate 720 degree (2x rotation)”
cas B : if input = 0.5 then rotate 360 degree (1x rotation)”
i really hope you get me, thank you once again 🙂
Comment by fred on 2017-09-12 10:57:00 -0700
hi
thanks for sharing.
i encounter a problem : i don’t know how to invert the direction of the movement.
depending on which button i will press first then the stepper will go in that direction no matter which of the 2 buttons i press (back or forward)
is there a specific proper way to invert the direction ? should i set speed to negative or something ?
my fragment of code :
case btnRIGHT:{
lcd.print(“GO! “);
stepper1.stop();
stepper1.moveTo(20000);
stepper1.run();
break;
}
case btnLEFT:{
lcd.print(“BACK “);
stepper1.stop();
stepper1.moveTo(-20000);
stepper1.run();
break;
}
Comment by shobha on 2017-10-25 04:58:12 -0700
can you please provide me c code to drive stepper motor?
Comment by Sarah S on 2017-12-29 17:15:28 -0700
Hi!
Thank you for the great information you’ve posted.
I’m designing a gripper for a robotic arm using a stepper motor. I’d like to modify your first code such that
- The stepper motor rotates to a certain angle( x number of steps) to open up the gripper
- Then the motor rotates in the opposite direction (y number of steps) to be able to hold the “predefined size” object
- And at this point I don’t want it to open again, so it could hold on to the object.
I was able to modify your code to obtain the first two but the problem is I don’t know how to “STOP” the loop when the motor reaches the “y number of steps”.
I moved the commands from the “loop” function to “setup” (and made the “loop” empty) in order to force it run only once but the motor doesn’t even move when I do this.
Would you please let me know your suggestions? I don’t know much about programming and Arduino.
Thank you!
Comment by Deve on 2018-01-19 10:32:38 -0700
I have 3D Printers that work with the NEMA17 Steppers. My question is, can a person use these smaller steppers in the same way at relatively the same speeds? I realize these are lighter servos, but I am hoping for higher response and faster movement than your example. Thanks for the great tutorial.
Comment by TDHofstetter on 2018-01-23 11:16:16 -0700
There’s a bit of variation in the gear ratios in these steppers, despite the fact that they all share the same exact model number. Some have an exact 64:1 ratio, some have an approximate 64:1 ratio, and some have an approximate 16:1 ratio.
Comment by Butch on 2018-02-02 17:26:21 -0700
Thanks. Worked great first time!
Modified to run two motors and two ULNs.
Noted that as I increased supply voltage, current increases also. My two motors draw 500mA with no load.
Comment by Jeremy S Cook on 2018-02-22 13:43:03 -0700
Thanks so much! After trying another tutorial unuccessfully, this finally got my stepper working 🙂
Comment by John Stephenson on 2018-03-28 10:16:48 -0700
Arduino’s I can handle as I have coding/playing with them for q few years. The real problem for me is finding the hardware!! Where the heck do you get yours from? p.s. Great post BTW.
Comment by Gwilym on 2018-05-02 00:27:29 -0700
Does anybody know where I can find the operating current for the stepper motor
Comment by JensJ on 2018-06-14 02:55:59 -0700
Thanks for the intro. One thing though; I noticed you mentioned having heat issues with some other methods of running this motor/driver. I am actually experiencing this with your solution described here; After running the motor for a few minutes it gets to hot to touch, which I don’t really understand. What is to expect?
Comment by Jordan on 2019-05-06 18:40:26 -0700
How many steps does it take for the motor to complete a full rotation?
Comment by Stephan on 2019-06-29 03:48:56 -0700
Thank you very much for this comprehensive and detailed explanation and guidance.
Also for someone whose native language is not English, like me, this description is easy to understand.
Comment by crispin on 2019-08-14 01:03:38 -0700
Expect ALL motors to get hot, large or small. Most stepper motor drivers have heat sinks that can burn you if touched. These motors are tiny but excessive heat is standard. Use thermal shielding tape perhaps?
Comment by joey alfred on 2019-10-07 06:17:20 -0700
Hello sir do you have a code for clockwise rotation then stop and move to counterclockwise direction then stop. Because i will command the stepper motor with the result of the height using ultrasonic sensor.
Comment by Anand sai on 2019-11-06 23:47:44 -0700
Hi sir I am trying to interface the motor with the help of l293d to interfaced 8051 microcontroller, now I used Texas-msp430 module can I connect the same L293d in this project to run motor please reply me
Comment by Jee on 2022-12-04 13:32:51 -0700
You don’t need to set 4076 pulses for 1 turn. Both 4 control methods and 8 control methods are 2038 pulses per revolution. It took me a week to figure out why my code didn’t work as expected, so I analyzed the pins on the oscilloscope and figured it out. However, the 8-step control method consumes less energy. I believe that the developer of the library made a mistake and defined something wrong in the code. the motor should have the same speed in both control methods.