In a previous post I shared my notes on how to connect an Arduino to an Android phone using the the popular and cheap HC-06 Bluetooth module. In that example I used the Bluetooth module with its default settings.
That works fine, but some applications may require changing the communication speed (Baud rate), the pairing code, the module name etc. For example, I am trying to set-up a way to program my Arduino Uno and Arduino Pro Mini wirelessly, over Bluetooth. This requires changing the baud rate of the module from the default 9600 to 115200, or 57600, to match the default sketch upload speed for these Arduino boards.
Also, if things are not working, you may want to restore the settings back their defaults and start troubleshooting from there.
There are multiple versions of the module floating around, with different firmware and breakout boards, but the general functionality should match the HC-06 Bluetooth module datasheet.
Step 1: Hook up the HC-06 Bluetooth module to the Arduino
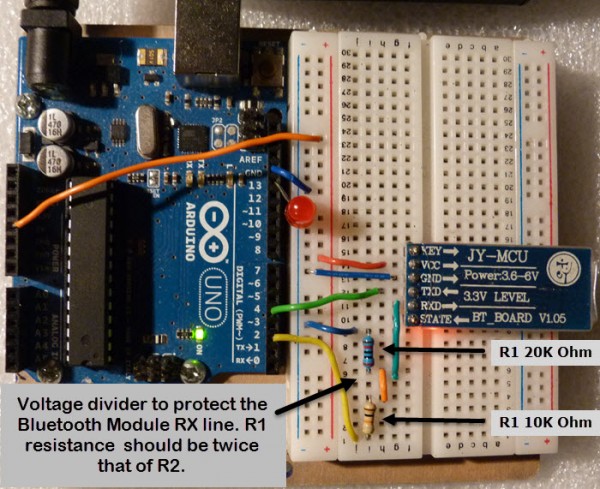
- Connect the HC-06 Ground (GND) pin to ground (duh!).
- Connect the HC-06 VCC pin to 5v.
- Connect the HC-06 TX/TXD pin to Arduino digital pin 4.
- Connect the HC-06 RX/RXD pin to Arduino digital pin 2.
It is recommended to use a level shifter, voltage regulator (or a voltage divider, like in my set-up below) to protect the Bluetooth module RX pin. It is designed for 3.3v operation, while the Arduino digital pins work on 5 volts. You do not need the LED on the Arduino pin 13 that I have on my set-up below.
Step 2: Upload the Arduino HC-06 configuration sketch
The Arduino sketch below will allow you to configure your HC-06 module using the Arduino IDE serial monitor. The Arduino will act as a middleman between the Bluetooth module and your computer. It will communicate with your PC over the built in serial connection through the USB cable, and with the HC-06 Bluetooth module over pins 4 and 2, using the Software Serial library.
The Software Serial library comes pre-installed with the latest version of the Arduino IDE. It has been developed to allow setting up serial communication on (almost any) digital pin of the Arduino, using software to replicate Arduino’s native serial support. See the SoftwareSerial library page for more details on its features and limitations.
#include <SoftwareSerial.h>
SoftwareSerial mySerial(4, 2); // RX, TX

String command = ""; // Stores response of the HC-06 Bluetooth device


void setup() {
  // Open serial communications:
  Serial.begin(9600);
  Serial.println("Type AT commands!");

  // The HC-06 defaults to 9600 according to the datasheet.
  mySerial.begin(9600);
}

void loop() {
  // Read device output if available.
  if (mySerial.available()) {
    while(mySerial.available()) { // While there is more to be read, keep reading.
      command += (char)mySerial.read();
    }

    Serial.println(command);
    command = ""; // No repeats
  }

  // Read user input if available.
  if (Serial.available()){
    delay(10); // The delay is necessary to get this working!
    mySerial.write(Serial.read());
  }
}
Credit: The code above is based on this article by user Ecno92
Step 3: HC-06 Bluetooth module configuration using AT commands
The HC-06 configurations options are covered in section 9 of the module’s datasheet.
The default settings are:
- Name / ID: linvor
- Baud rate: 9600
- Pairing code / password: 1234
- No parity check
Testing communication with the module:
- Open the Arduino Serial monitor. make sure you have selected the correct port and Baud rate of 9600
- You should see the text: Type AT commands!_ _. If not, something is wrong and you need to re-check your set-up
- Type AT in the Arduino IDE Serial monitor input field and press the Send button. You should see the response: OK_._ Now you are ready to change the module’s settings!
- Type AT+VERSION without spaces in the Arduino IDE Serial monitor input field and press the Send button. You should get a response that will have the module name and version, like: OKlinvorV1.8
- One of the more useful attributes is the Bluetooth baud rate. You can set that by sending a command like AT+BAUD4, where the last number (4 in this case) is defining the rate as follows:
AT+BAUD1———1200
AT+BAUD2———2400
AT+BAUD3———4800
AT+BAUD4———9600 (Default)
AT+BAUD5———19200
AT+BAUD6———38400
AT+BAUD7———57600
AT+BAUD8———115200
AT+BAUD9———230400
AT+BAUDA———460800
AT+BAUDB———921600
AT+BAUDC———1382400
If you enter **AT+BAUD4_ _**you should receive a response OK9600. Do not set a rate above 115200, as you will not be able to communicate with the module through your Arduino at that speed.
Refer to section 9 of the module’s datasheet for all other available configuration options. In the video below I change the Baud rate of the Bluetooth module from 9600 to 115200.
Comments
Comment by rafe on 2014-06-04 13:47:56 -0700
Hi stan, I have an issue with my arduino and bluetooth module
Im using blueterm(android) to send text to the arduino and I want to precess it, but when I debug with the serial monitor , it shows only garbage character, always shows □□□
I set the serial with 9600 baud rate for the bluetooth and the same for usb serial
Do you have any idea how solve this
Comment by Stan on 2014-06-05 16:45:23 -0700
Did you also pick 9600 as the baud rate in the Arduino serial monitor window? If yes. likely the Bluetooth module is configured to run on a different baud rate than 9600. That is the only think that I can think of.
Comment by Ollie on 2014-08-18 06:27:27 -0700
hello, the Type at commands! shows up but when I send AT nothing happens. please could you help
Comment by BijendraSingh on 2014-08-20 21:55:37 -0700
hi!!
i connected jy-mcu with arduino uno using softwareSerial, also i connected lcd with arduino uno. Both LCD and JY-MCU is working fine. But i saw a voltage fluctuation on LCD screen. i measure the voltage at lcd, voltage fluctuation is between 4.5v to 3.9 v. also when i removed the JY-MCU no fluctuation appear on lcd.
kindly suggest how to solve this issue..?
Comment by tzafrir shlomo on 2014-10-05 02:17:40 -0700
I would like to receive more details about communication between two arduinos using jc-06 bluetooth
thank you
tzafrir
Comment by will on 2014-10-11 22:35:31 -0700
thanks for this. initially i did not get the ‘OK’ response but upon removing some other devices from the 5V feed and changing the line endings setting in serial monitor it worked.
Comment by hartwig on 2014-11-16 05:48:00 -0700
Hi, looks like, that your voltage divider might have a problem. The resistor with the 20K label on the photo has a black ring in the middle (not an orange, as expected). So with such a small value the devider works with nearly 5 V, which seems to be OK. Please check again.
Comment by Mustafa on 2014-11-24 15:57:37 -0700
Hello, Im trying to control an Elevator using an Arduino UNO and HC-06 Bluetooth module .
When Im sending data from the Android Mobile App I noticed that their is fluctuation.
My Code is:
void loop(){
if(Serial.available()>0){
while(Serial.available()>0){
state = Serial.read();}
}
if(state == ‘1’){
F1 = HIGH;
F2 = LOW;
F3 = LOW;
F4 = LOW;
}
else if (state == ‘2’){
F2 = HIGH;
F1 = LOW;
F3 = LOW;
F4 = LOW;
}
else if (state == ‘3’){
F3 = HIGH;
F1 = LOW;
F2 = LOW;
F4 = LOW;
}
else if (state == ‘4’){
F4 = HIGH;
F1 = LOW;
F2 = LOW;
F3 = LOW;
}
Serial.println(F2);
}
F2 should be HIGH if and only if I send number (2) from the mobile to arduino;
However,what is happening with me is that if I send number 3 or number 4 , F2 will be HIGH for a small time then will turns LOW(Zero).
I wants F2 to be HIGH only if I send number 2 from mobile to the arduino.
Can anyone helps !
Thanks in advance.
Comment by Antonio on 2014-12-12 19:42:53 -0700
When I type AT in the serial monitor, I don’t get OK back, so something is wrong. How do I set the Jy-MCU back to factory settings, so I can start over?
Thanks………..Antonio
Comment by lemire on 2014-12-13 01:48:00 -0700
r 20k is 1% with five color rings : red black black red +tolerance brown=1%
http://www.digikey.com/en/resources/conversion-calculators/conversion-calculator-resistor-color-code-5-band
Comment by D9ve on 2014-12-22 13:56:44 -0700
Hey,
I guess you did not manage to convert your HC-06 into a wireless programmer?
However if you did, what technique did you use to enable the rest, to complete the programming sequence?
With a HC-05 I have seen that you tap a wire from pin 32 on the BT module, and use the command AT+POLAR=1,0.
With my HC-06 the firmware version 1.5 doesn’t support this command, i am assuming that v1.8 doesn’t either.
Any help here would be greatly appreciated.
Regards
Dave
http://wiki.pinguino.cc/index.php/SPP_Bluetooth_Modules#HC-06.2FLinvor_v1.4.2Fv1.5_firmware_versions
http://makezine.com/projects/diy-arduino-bluetooth-programming-shield/
Comment by D9ve on 2014-12-22 14:04:06 -0700
I would check your value of state and work from there….
Comment by D9ve on 2014-12-22 14:06:36 -0700
what micro control unit? Check this link most AT functions are not supported in versions <= V1.5?
http://wiki.pinguino.cc/index.php/SPP_Bluetooth_Modules#HC-06.2FLinvor_v1.4.2Fv1.5_firmware_versions
Comment by StanD on 2014-12-26 00:32:39 -0700
Hi D9ve, I got it working, but with some intermittent issues. I was on a Windows 7 machine at the time and used the Arduino 1.5.6 Beta IDE. Essentially the approach was as follows:
- Configure the HC-o6 module to communicate on the correct baud rate, depending on the Arduino variant you are programming. I used an Arduino Pro Mini as a test subject.
- Connect the HC-06 to the Arduino using the SoftwareSerial library
- I uploaded a sketch (via a USB cable) on the Arduino that listens for a “restart” command (I used “R”) via the Serial over Bluetooth set-up.
- When a “restart” command is received via the Serial over Bluetooth connection, the Arduino pulls a digital pin (I used 2) low. The digital pin triggers a Monostable Multivibrator Circuit using a 555 timer, that pulls the Arduino reset pin down. The restart process then kisks off the bootloader. The 555 timer circuit might be an overkill, but the Monostable Multivibrator guarantees that the Arduino reset pin will be held low for sufficient time. BTW: using the Watchdog timer to restart the Arduino does not seem to trigger the Bootloader, so it was a dead end for me.
- After sending the “restart” command I upload the new sketch over the com port where the Bluetooth connection is established.
This generally worked. Occasionally, I would get out of sync errors. Often I got an error at the end of the upload (can’t remember the specific code), but the sketch had actually been loaded successfully. I did not try very large programs to test if the size of the file matters. I moved on to other projects, life got in the way…Overall, I think the HC-05 module might be easier to use. The easiest is probably the Bluetoth module by Adafruit (Bluefruit EZ-Link) that has a DTR / reset pin in the breakout board and automatically selects the correct communication speed.
Comment by learning kid on 2015-01-21 06:49:30 -0700
Hi, i have a question and i hope you guys can help me with this. how does the arduino actually know actually know which data it is going to send or receive? in which part of the code does it do that? i want to make two arduinos one having a HC05 as a master sending data over to a HC06 slave on two different laptops. I hope you can answer me.
Comment by JeromeM on 2015-03-20 08:16:57 -0700
Hello, I’ve got a vexing issue. I followed the method above to modify the Baud rate of my HC-06, and since I’m curious I’ve tried to set a baud rate greater than 115200bps (more precisely I’ve tried 230400bps). The problem is that today I can’t communicate anymore with my HC-06 since my Arduino UNO is apparently not able to Serial.write correctly with a baud rate of 230400bps.
Now, I just have the feeling to be stucked out of my flat without the keys…
Have you got any workaround to send a new ATCommand “AT+BAUD4” to my HC-06?
Comment by Stan on 2015-03-22 15:48:21 -0700
Hi Jerome, you might have some luck using a terminal program directly (without going through the Arduino IDE). I never had to do that, so unfortunately can’t provide much help here.
Comment by JeromeM on 2015-03-24 07:14:02 -0700
Thank you Stan, I’ll try as soon as I get my serial plug. For the moment, I just bought a new HC-06.
Comment by Walter on 2015-04-19 14:18:25 -0700
How can I get the signal strength on the HC-06 Bluetooth nodule if possible give steps please I have been trying
Comment by Julian on 2015-04-25 10:26:18 -0700
I am getting the same absent response. I went through and tried changing “baud” in the script and no response from any one of them?
Comment by KJ on 2015-10-09 09:04:28 -0700
HI when i key in “AT”, it give me the response of below
O
K
Comment by malika on 2015-10-16 21:53:41 -0700
what softwares are needed to do it?
Comment by Tom on 2015-12-28 07:05:33 -0700
I’m hoping that someone can help me to get the HC-06 up and running. It appears the problem is that the HC-06
remains disconnected, however It is paired. The led on the HC-06 keeps flashing. The voltage to the RXD on the Hc-06 is .96 volts. The TX pin from the Arduino is connected to the 4.7 k resistor divider, the voltage at this resistor is 1.4 volts. When the jumper from the TX is the voltage measures 4.8 volts. I’m not sure what’s bringing the voltage to 0.91 volts at the 4.7K/10K divider. Is 3.3 volts the minimal voltage that is required at the RX of the HC-06?
Comment by Stan on 2015-12-28 13:34:11 -0700
Tom, you may have a faulty module (happened to me once). I was able to connect to the module and issue AT commands, paired successfully, but could not connect. Wasted a lot of time troubleshooting with no luck. Do you have a spare, you can test your set-up with?
Comment by Tom on 2016-01-04 22:30:22 -0700
Yes, I have 3 HC-06 and tried them all with the same results. Remain disconnected and unable to send AT commands. Any other ideas??
Thanks
Comment by jose on 2016-03-25 03:14:47 -0700
Why are you using 5v as vcc when in datasheet is said that you have to use 3.3v?
Comment by Stan on 2016-03-26 13:07:05 -0700
The version of the module I have is mounted on a board with a 3.3v voltage regulator (like almost all I have seen), so it is safe to power the module with 5v. The communication lines though are still 3.3v and there is no built in level adjustment, so if you are using a 5v Arduino, you need to do that yourself.
Comment by Farrukh on 2016-03-28 05:26:33 -0700
hi i have a problem
i have followed your tutorial and i can only see “Type AT Commands! on the serial monitor but i cannot receive any response from the Bluetooth module
can you please suggest
i have checked the rx voltage by applying the voltage divider and i can read voltage 3.25 max and it range from 2.8 to 3.25
do you think this could be the fault?
Comment by akma on 2016-05-18 20:38:35 -0700
Did you solve your problem? i got stuck on the same problem too , please help
Comment by perigalacticon on 2016-05-26 22:21:58 -0700
Hello,
I am trying to do an automatic BT uploader for the UNO, but ran into a snag. I based it on the Makezine article: http://makezine.com/projects/diy-arduino-bluetooth-programming-shield/
I am controlling AT mode with the Uno through pin 34, and using pin 32 low output to reset the Uno per the instructable circuit. The snag is when the polar=1,0 command is active, then there is also a low pulse on pin 32 when re-entering AT mode by bringing pin 34 high again. This is causing the Uno to reset. According to several sources pin 32 should only go low when a BT connection is made, but it is also occurring when entering AT mode and also when powering on the HC-05. This makes it impossible to run the sketch because its resetting the Uno.
Do you have any ideas for how to fix this? The pin 32 low pulse is 1-2 ms then it is constant high 3.3V again.
Thanks
Comment by Daniel Fernandes on 2016-09-10 10:38:59 -0700
Hello Friends! Already I tried everything but I can not!
I received the message “Type AT commands” but when I type the command, do not receive return; If anyone can help me, thank you
Comment by Manny on 2017-05-06 23:31:41 -0700
Hello,
I have followed your instructions with success!
For my case, within the Arduino IDE serial monitor, I simply had to choose “No line ending” and I managed to upgrade the baud rate to 115200.
Thank you very much for your very helpful post:-)
Manny
Comment by Sam Wong on 2018-01-25 20:46:40 -0700
Problem of entering AT command mode
I connected my new HC-06(4 terminal points) to the Arduino UNO exactly as the diagram shown above and successfully uploaded the sketch. However, I didn’t get a response after entering “AT” via the serial monitor. I tried different baud rate and “no line ending, new line, both NL & CR” but none of them worked. I checked the connection numerous times and could not find a mismatch. The only thing I found is that my HC-06 does not have a “key” but replaced by a “EN”. Is this the culprit of my failure?
Remark: I believe my HC-06 is physically sound as it could communicate quite well with my mobile phone via “Bluetooth Terminal” yesterday.
Thanks.
Comment by Mohammad on 2018-12-10 11:14:38 -0700
hello everybody.
i have two questions i hope someone could help me:
first, are name, pin code and baud rate set on hc-06 when it is bought?? and when you connect vcc and ground, you should be able to search and find, and pair it???
i mean is it possible these elements be empty??
and the second question:
recently i bought hc-06, and after some days try i could get access to Bluetooth module through AT commands.
But because none of my devices could find the hc-06 Bluetooth module i tried other AT commands to check what the problem is.
AT+PO (which changes the parity) was the command which caused i lost access to AT commands.
could anyone help me to take it back to none parity?
by the way: sorry for lack of English and i am beginner in working by Arduino Uno
Thanks a lot
Comment by blackbee on 2019-03-11 20:58:38 -0700
Hello, what if I type “AT” and there is no response? Is the Bluetooth HC06 is not working or receiving any data?