The purpose of this tutorial is to cover the basics of setting up a connection between Arduino Uno and an Android phone via Bluetooth. Smart phones pack a ton of cool features (camera, accelerators, speakers, microphone, a nice screen to show data from your sensors, wi-fi adaptor…) that will make an excellent addition to a robot, or any other Arduino project.
I will use Blueterm a basic free Android terminal emulator app to send a single digit (zero or one) from a phone to a BlueTooth module connected to the Arduino Uno via a serial connection. The Arduino Uno will read the data and will turn an LED on, or off accordingly. After that it will send a status message back, which will be displayed on the phone’s screen. This will essentially confirm we have a two way communication between the Arduino and the Android phone over Bluetooth. The same approach can be used to interact with anything connected to your Arduino (like motors, servos and sensors) or the cool goodies in your smartphone (camera, accelerometer etc.). So let’s get stared!
This is what you will need:
- Arduino Uno (or compatible board)
- A computer with latest version of the Arduino IDE installed
- An Android smartphone with Bluetooth capability
- JY-MCU Bluetooth Module. It is a cheap Bluetooth module that can be purchased from many retailers online, or from eBay. (I got mine from here)
- Some way of shifting down the voltage of the Arduino signal line from 5V to 3.3V. A couple of resistors will work fine. I use one 20K Ohm and one 10K Ohm, but other combinations will work as well. More on that below…
- The Blueterm free Android app so we have a simple way of sending commands to the Arduino from our phone.
Step 1: The Arduino Sketch
We need a simple sketch that will do the following:
- Establish a serial connection between the Arduino and the Bluetooth module
- Listen for input on the serial port and process it
- Turn the LED on pin 13 on, if it reads 1 (one) as serial input
- Turn the LED on pin 13 off, if it reads 0 (zero) as serial input
- Send “LED: on” or “LED: off” back to the Bluetooth module depending on the status of the LED
For simplicity, we will just be sending just the integers 1 or 0 from the phone as commands. If any other character is sent, it will be ignored. Upload the sketch below to your Arduino. By default the Bluetooth module I am using is configured to use the 9600 bps data rate. Here is link to our basic sketch
Step 2: hooking up the Bluetooth module to the Arduino Uno
The JY-MCU module communicates with the Arduino via a serial connection. It has four pins that we will be using:
- VCC is used to power the module. It needs to be connected to the Arduino 5v pin.
- GND is the ground pin. It needs to be connected to the Arduino Ground pin
- TXD is used to send data from the module to the Arduino. It needs to be connected to the serial receive pin (RX) of the Arduino, which is pin 0 in case of the Uno. If you are using a different Arduino board, check its schematics to make sure you have the right pin.
- RXD is used to receive data from the Arduino. It needs to be connected to the the Arduino serial transmit pin (TX) , which is pin 1 in the case of Arduino Uno.
- We will not be using the “STATE” and the “KEY” pins of the Bluetooth module, so they will not be connected.
Here is how my Bluetooth module looks like. There are several variations out there that work pretty much the same:
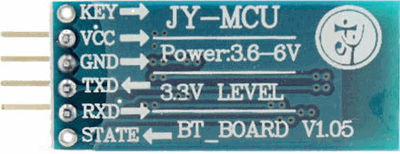
On my module, as you can see from the photo above, the TX line is rated at 3.3V. This means that even though we can power the module with 5 volts from the Arduino, the communication lines from and to the module are supposed to be at 3.3 volts.
Sending data from the Bluetooth module (via the module’s TX pin) will not be an issue, as the Arduino’s RX line will interpret the 3.3V signal from the Bluetooth module correctly.
Receiving data from the Arduino is where we need to do more work. The RX line of the Arduino Uno is running at 5V, so we will be sending a higher voltage on the Bluetooth’s module RX line, than suggested by the label. This may damage the Bluetooth module permanently!
Many online tutorials suggest that this is not an issue and the TX / RX lines of the JY-MCU Bluetooth module can be connected directly to the Arduino safely. I did not want to risk burning my Bluetooth module though in the first seconds of usage and to have to wait several weeks for a replacement to arrive in the mail. To be on the safe side, I used two resistors to create a voltage divider and drop the voltage of the Arduino TX line signal from 5 volts to approximately 3.3 volts.
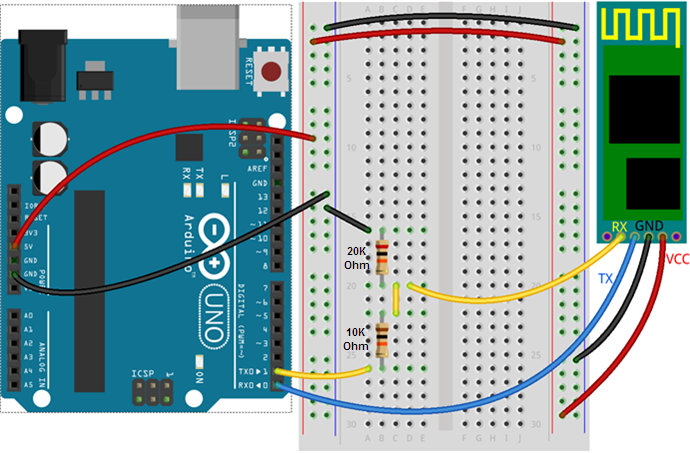
I used a 20K Ohm and a 10K Ohm resistors, but you can substitute those for other values, as long as you get a Vout of about 3.3 volts based on the voltage divider equation below:

In the diagram above we have R1 = 10K Ohm and R2 = 20K Ohm and Vin = 5v. Solving for Vout we get: Vout = 5 x 20k Ohm / (20k Ohm + 10K Ohm) = 5v x 20k Ohm / 30k Ohm = 5V x 2 / 3 = 10V / 3 = 3.33 V.
Essentially, you can use any combination of resistors, as long as R2 is twice the value of R1.
If you do not have resistors handy, you can use a positive 3.3v voltage regulator. Connect the Input pin of the voltage regulator to the Arduino TX line, the Ground pin to the Arduino Ground and the output pin of the voltage regulator to the JY-MCU RX line.
The third option is to use a dedicated logic level converter board, like this one, by Sparkfun.
Step 3: Preparing the Android phone
- Install the Blueterm free Android app to your phone.
- Make sure that Bluetooth is active and enabled on your phone. Follow the settings menus on your phone, the Bluetooth settings should be under “Wireless and Networks” category.
Step 4: The fun part!
Finally it is time to test our set-up!
- Power up the Arduino Uno (and the Bluetooth module). My Bluetooth module has a red status LED that is blinking when the module is powered up, but not connected.
- Pair the module with your phone. The defaults for the Bluetooth module are:
Default Name: linvor
Default Pairing code: 1234 - Once you have successfully paired your phone and the BlueTooth module, open Blueterm.
- Connect to the Bluetooth module (default name linvor) from the Blueterm menu. You should see a message that the connection was successfully established. The red status LED on my Bluetooth module switches from a blinking to steady on, when it is connected.
- Type “1” within the Blueterm console. The built in LED on the Arduino Uno should turn on and you should see “LED: on” on the Blueterm console screen. Now type ‘0’ (zero). The LED should turn off and you should see the message “LED: off”.
Congratulations, you are done!
Next: Use SoftwareSerial with Bluetooth in order to make it easier to program your Arduino and debug your code when using the JY-MCU Bluetooth module.
Troubleshooting tips:
- The first thing to check is the wiring between the Bluetooth module and the Arduino.
- Make sure that you have loaded the sketch from Step 1 on the Arduino, before you connected the Bluetooth module to your phone. You will not be able to use the Arduino IDE serial monitor, or upload sketches when the Bluetooth module is connected as it uses the same RX/TX lines. You can use the SoftwareSerial library to connect the Bluetooth module to any digital Arduino pin and keep the RX/TX line open.
- Confirm that Bluetooth is enabled and active on your phone by checking the settings.
- I had Blueterm crash on me a couple of times. Not really much to do here, except to open it up again and reconnect!
Comments
Comment by Pavel on 2014-03-09 20:33:41 -0700
Great tutorial!
I was wondering if there is a way to do the same thing you did here but instead send the “signal” to the Phone instead of the Arduino.
What we want to do is send a large package of information from our Arduino device to the Android Phone through Bluetooth and we were wondering how we could do that.
Our Arduino Uno is connected to a Adafruit Micro-SD breakout Board which has data saved from a CMOS Light sensor (who’s signals were converted to a large set of bytes).
We want to be able to send that data to our phone which will save it through bluetooth.
THank you in advance for any comments!
Comment by Pavel on 2014-03-09 20:37:52 -0700
Or actually a CCD sensor (where working with both a CCD and a CMOS sensor). Basically an analog-to-digital converter turned each pixel’s value into a digital value of the CCD chip and we stored it in the SD Shield of the Arduino Uno and now we want to be able to send that data over Bluetooth 🙂
Comment by pankaj on 2014-03-10 03:43:45 -0700
http://cwires.blogspot.in/2013/07/charge-coupled-devices-ccd-vs-cmos.html
Comment by Stan on 2014-03-10 16:33:20 -0700
Hi Pavel,
I simply think of the Bluetooth connection as a replacement of the cable between the Arduino and the PC. You are still sending serial data out from the Arduino, but over Bluetooth. The Bluetooth module just allows it to send it to any paired, Bluetooth enabled device instead.
Comment by Daniel on 2014-04-12 09:36:22 -0700
Hi,
Really liked this tutorial, but i have a problem. I did everything exactly as you wrote, except I used three 5 Ohm resistors (I connected two serially). Where should be approximately 3.3V i only got 1V. So I don’t got the message LED on and off, but I can turn on and off the LED. Any suggestions?
(I used arduino nano board.)
Comment by Daniel on 2014-04-12 10:11:35 -0700
Hi, solved it 🙂
Comment by Stan on 2014-04-12 10:17:06 -0700
Good to hear, thanks for stopping by 🙂
Comment by deeksha on 2014-04-25 03:42:24 -0700
respected sir,
For some new softwares that we are supposed use we have to include some libraries.My question is that for the code that you have given to glow an led through bluetooth by giving an instruction from android phone are we supposed include any libraries?
Comment by Stan on 2014-04-25 09:18:09 -0700
Hi Deeksha, no external Arduino libraries are required for this example. If you follow the wiring diagram and the sample code in the post, you should get the same result as in the video.
Stan
Comment by Rafael G on 2014-05-09 20:05:25 -0700
Hi, I also followed all of your instructions, but I can’t seem to get the arduino to recieve any of the numbers I send it, it doesn’t show in the Arduino Monitor nor the LED blinks.
Seems weird because the bluetooth module does stop blinking when I couple the phone and the module, and I get a Succesfully conneted message on my phone.
Hope you have any pointers to where I might have done something wrong. Thanks.
Comment by Stan on 2014-05-10 19:49:19 -0700
Hi Rafael, I would suggest to double-check all physical connections and make sure the pin assignments in your code match them. Also, I would suggest to try the set-up and code in this example: http://ecno92.blogspot.ca/2012/11/jy-mcu-linvor-at-commands-change-name.html. It could be that your Bluetooth module is set to work on a different baud rate…Good luck and post back if you make progress!
Comment by Rafael on 2014-05-23 11:20:55 -0700
Hello, first of all – nice tut and thank you for it ;D.
I seem to have a problem. I’m able upload the program to my arduino but it shows a message right after “Binary sketch size: 2.476 bytes (of a 32.256 byte maximum)” :
–> “avrdude: stk500_getsync(): not in sync: resp=0x00”
i’ve checked and it looks like everything is connected properly and i’m also able to make the blinking led on the BT become steady (I can connect to it with the android app). The problem is when i type 1 or 0, nothing happens. I wonder if it’s related to the error shown. PS: my BT looks exactly like yours.
Comment by Stan on 2014-05-23 13:22:08 -0700
Hi Rafael, try unplugging the BT module from the breadboard, uploading your code and then plugging the module back in. You will not be able to upload sketches, while the BT module is powered up and connected to the TX / RX pins of the Arduino. Cheers, Stan
Comment by rafe on 2014-06-04 08:17:49 -0700
Hi Stan, I have seen in others sites that the people connect RX, TX directly to the arduino with out any resistance, do you know why is that?
Comment by Jerah on 2014-06-04 10:21:02 -0700
Hello, Thank you for this great tutorial! Quick question, I hooked everything up accordingly, I have the red blinking light on the BT module, however when I scan for new devices from my phone (Galaxy s4 android 4.4.2) it’s not seeing “linvor”. I’ve tried multiple times, disconnected, re-connected, reboot my phone, etc. And still doesn’t seem to pick it up. It see’s a “HC-06” and a “Bluetooth USB Host Con..” as new devices, not sure if those could be one of them just re-named? Any ideas what could be going on?
Comment by Jerah on 2014-06-05 16:13:50 -0700
Hello,
Do you have any ideas if my BT module is blinking red, but it’s not displaying the default name to pair with?
Comment by Stan on 2014-06-05 16:42:15 -0700
Some breakout boards regulate the RX feed to 3.3v in the module. I have also connected the module directly when I was lazy, but to be on the safe side it is good to put a level shifter, or voltage divider of some sort.
Comment by Stan on 2014-06-05 16:43:13 -0700
I think the HC-06 is the one you need. I purchased a second BT module from eBay recently and it shows as HC-06. Hope that works!
Comment by andysuth on 2014-07-18 12:15:33 -0700
where you using the wrong side of the potential divider?
or did you potential divide between signal and +5v?
Comment by andysuth on 2014-07-18 12:18:19 -0700
nice tutorial. wired up and ready to go!!!
looking to write an android app too.
now, where did i leave that pc?????
andy.
Comment by Brian on 2014-08-17 16:57:33 -0700
Great job easily connected my new hardware to blue term. Any way to automatically send high signal upon BT connection? As in walking down a long corridor of locked doors. BT connect unlocks as it connects and as I travel away and lose signal it locks behind me? Thanks!
Comment by SAI PRASAD on 2014-09-06 09:31:22 -0700
Very AWESOME tutorial !!! Keep it up … Helpful for both beginners and advanced people working with arduino..
Comment by Valen on 2014-09-14 13:51:35 -0700
If anybody has problems with a version 1.06 board then consider what this blogger found out:
http://mcuoneclipse.com/2014/03/30/getting-bluetooth-working-with-jy-mcu-bt_board-v1-06/
Comment by andres on 2014-10-23 19:08:51 -0700
Hi Stan I wanted to do what you did but instead turn the led when I receive a call, any suggestions?
Comment by Stan on 2014-10-24 22:12:00 -0700
I guess you will need to make an Android app that monitors for incoming calls and then sends commands via serial over Bluetooth. Not sure if you read my post on App Inventor 2, but if you are not familiar with Android development, you may want to try it out. From what I can see in the App Inventor 2 documentation it should be pretty easy to detect an incoming text message: http://ai2.appinventor.mit.edu/reference/components/social.html#Texting
There is an example for incoming calls as well, but that seems to not be fully supported: http://appinventor.mit.edu/explore/ai2/piccall.html
Comment by Lemar on 2014-12-23 09:20:53 -0700
How many data rate capability from bluetooth to the phone
Comment by Daniel on 2015-03-09 23:49:35 -0700
Hi, I am able to connect my Android phone to HC-06 module. But, the connect option won’t appear. I can’t connect my phone to Bluetooth module. What should I do?
Comment by Aditya on 2015-03-12 03:45:18 -0700
sir,
can u plz post the “hooking up aurdino and bt module” again or send on my mailbox. With a image.??
Comment by khouttoul on 2015-04-14 02:05:55 -0700
hello, I did exactly the same steps as in the tutorial but I get only failures…
help me please
Comment by Larry Boyer on 2015-05-07 06:25:34 -0700
Thanks a lot. Great hardware & Arduino software explanations.
My only issue is pairing. I couldn’t pair with any general Android or iPhone bluetooth terminal apps. The only thing that paired with the chip was an Arduino Android app.
Is there a way to make the chip more ‘discoverable’ maybe?
Comment by Julio Rojas on 2015-05-19 16:37:11 -0700
Amigo buenas tardes muy bonitos sus explicaciones quería pedirle un favor tengo un programa con bluetooth hc-05 y una aplicación android diseñada en app inventor y funciona muy bien pero tengo un problema es que quiero que ca vez que mi celular se acerque al mudulos bluetooth se conecte automaticamente y no e podido será que esta función se puede hacer. Osea lo que quiero es que sea algo parecido como funcionan los manos libres de los celulares bluetooth que si se aleja del celular se desconecta y cuando se acerca se conecta automáticamente.será que usted me podría ayudar gracias
Comment by Kavin Motlani on 2015-05-29 07:01:14 -0700
Thank You very much for the article.It has been very helpful.
Can you provide me with the source code of the app(blue term) you suggested or any similar app.
Comment by ale_ale on 2015-07-12 06:32:01 -0700
Hi,i woul like your help for a project that i have to tele-controll with android phone and hc-05 a 220v bulb.Actually i am using a 5v reley,a Photoresistor Sensor Module Light Detection Light for Arduino,android phone,arduino uno.Untill now this is the code i have used,is not complete.i am asking your help for this code because there are cases when i type to my android phone a 1 it dot give me always a 49 to serial monitor(arduino) or to the above condition i have specified that if the value i give is equal to 49 the bulb must stay on 2 seconds and off 8seconds,but it does the reverse,how can i solve this problem
Serial.print(ReadBT);
if (ReadBT == 49)
{
Delay = 8000;
Serial.println(“DDDDDDDDDDDDD”);
}
else
{
Delay = 2000;
Serial.println(“CCCCCCCCCCCC”);
}
digitalWrite(Relay, HIGH); // turn on relay
delay(10000-Delay); // time OFF
digitalWrite(Relay, LOW); // turn off relay
delay(Delay); // time ON
}
This is the code i have created until now
///////////////////////////////////////////////////////////////////////////////////////////////////////////
///////////////////////////////////////////////////////////////////////////////////////////////////////////////////
#include
int Relay = 7;
int BTtx = 10;
int BTrx = 11;
int ReadBT;
int Delay;
SoftwareSerial bluetooth(BTtx, BTrx); // TX | RX
void setup() {
// put your setup code here, to run once:
Serial.begin(9600); // opens serial port, sets data rate to 9600 bps
bluetooth.begin(9600);
bluetooth.print(“$$$”);
delay(100);
bluetooth.println(“U,9600,N”);
bluetooth.begin(9600);
Serial.println(“setup complete.”);
pinMode(Relay, OUTPUT);
}
void loop() {
// if theres data from the bluetooth module
if (bluetooth.available()) {
ReadBT = (int)bluetooth.read();
Serial.println(“BBBBBBBBBBB”);
//echo it to the serial monitor
//Serial.print(“bt module said:”);
Serial.print(ReadBT);
}
//if theres data from the serial monitor
if (Serial.available()) {
ReadBT = (int)Serial.read();
Serial.println(“AAAAAAAAA”);
//send it to the bluetooth module
bluetooth.print(ReadBT);
}
Serial.print(ReadBT);
if (ReadBT == 49)
{
Delay = 8000;
Serial.println(“DDDDDDDDDDDDD”);
}
else
{
Delay = 2000;
Serial.println(“CCCCCCCCCCCC”);
}
digitalWrite(Relay, HIGH); // turn on relay
delay(10000-Delay); // time OFF
digitalWrite(Relay, LOW); // turn off relay
delay(Delay); // time ON
}
2.I have bought this light sensor for my project:http://www.ebay.com/itm/1PC-Photoresistor-Sensor-Module-Light-Detection-Light-for-Arduino/251673864995?_trksid=p2045573.c100033.m2042&_trkparms=aid%3D111001%26algo%3DREC.SEED%26ao%3D1%26asc%3D20131017132637%26meid%3D93d7e24c9d784838bf12ddf7c9ee88f1%26pid%3D100033%26rk%3D1%26rkt%3D4%26mehot%3Dpp%26sd%3D251673864995,can anywone help me with a code how to sens light intensity during day/night(considering even the condition that when it is bad/cloudy time i dont want my llamp to get turned on,i want the bulb to get turned on when the sensor sens the dark(for example 8pm) and to turn off the bulb when it is light(7 pm))
Comment by circuit on 2015-07-26 06:58:08 -0700
Hey Stan,
I need your help on app. how you develop blueterm app kindly reply me soon.
Comment by Gabriel Rodriguez on 2015-08-06 04:51:28 -0700
THANK YOU SO MUCH FOR THIS TUTORIAL!!! You have made my life so easy with it 😀 I have made a few modifications to the code and hardware in order to turn on/off 4 leds independently from one each other, and it has worked perfectly 😉 The reach of the bluetooth connection has impressed me greatly 😀 Thank you so much again!
Comment by Stan on 2015-08-11 23:58:40 -0700
You are very welcome, thanks for posting back!
Comment by Alan on 2015-11-18 14:13:22 -0700
I had the same problem, I can pair the devices but it won’t connect.
Comment by Fred Dinkler on 2016-02-10 08:30:06 -0700
This looks like a good starting point for something I am trying to do, I was hoping you or another reader might be able to point me in the right direction for what to do next. I have a classic car, and I can’t see its tail. I want to make a backup rangefinder that does not modify the car and be minimally apparent from the outside. My plan is to hang sonar rangefinders just under the bumper, hook those to an arduino and pair that via bluetooth. So for this is all easy peasy, I could use blueterm and just get numeric value ranges. But I want to write an app, that auto-pairs and gives me a bar graph and beeps. Writing apps isnt too hard either.
Here is the question: Is there any hand framework for communicating via bluetooth or am I going to have to make low level API calls? Can I reconfigure the JY-MCU Bluetooth Module to look like something specific / unique? I’d like to code this all to be compatible and generic enough that anyone could use the sketch + app in the same way with the same gear.
Comment by Kyle Miller on 2016-02-23 05:33:43 -0700
I am really surprised that more people haven’t destroyed their arduino using this method. The problem is the potential divider circuit. The divider doesn’t work properly because the impedance load into the bluetooth module is not taken into account. At best you get away with it, at worst the blue smoke demons escape.
One of the posters said he used 3 5ohm resistors. That is a total resistance between one of the output pins and ground of 15 ohms! This means that the current will be 5/15 = 333 mA. Look at the specs for an arduino uno and the max current to draw from an output pin is 20mA recommended.
Really you should use a transistor pulldown with a resistor connected to the 3.3v line or at least something a bit more complicated than a potential divider. That may be why you are gettting random crashes of the bluetooth module because the current flow into the bluetooth module is limited (in your case) to 0.5mA (because of the 10K resistor) into the input which I admit should be enough but really is not very robust if transient demands are involved.
Comment by moonlight on 2016-02-27 21:14:56 -0700
HI. how about when i play music through my android phone,will the arduino excute na program in it?for exmple the dancing lights?.
Comment by Shyam on 2016-02-27 21:17:04 -0700
I have installed blue term app but it is showing blank screen..what do i do.??
Comment by Tazeen on 2016-03-01 12:00:08 -0700
Can we operate 20 relay to control via Bluetooth
Comment by reyjohn on 2016-03-03 11:48:49 -0700
hi.
can we make an android phone(which is paired via bluetooth to the arduino) send an message alert to a number if the PIR sensor is activated(which is connected to the arduino) and in the same instance the buzzer will buzz(which is connected to the arduino)
thank you
Comment by zana on 2016-03-28 15:57:18 -0700
hi can you wrote the software for this project
Comment by Marty on 2016-04-30 12:04:13 -0700
Same problem here. Did you ever figure it out or is it just a bad module?
Comment by Marty on 2016-04-30 12:18:18 -0700
Nevermind. I found I had the GND connected to the wrong GND on the Arduino.
Comment by Alex on 2016-06-22 05:56:08 -0700
Hello! May i ask you something, please?
After few switches between 1 and 0 the commands gone wrong.
Sometimes when i send 1, the recived message is “LED: off” (and of course, led is off)
Comment by sunil v on 2016-07-30 16:58:24 -0700
what do i have to do to pass the blue screen on blueterm? i tried to keep it close to HC-05/arduino, but nothing happens! – do i need to type something? pl help.
Comment by Murali on 2017-06-03 07:29:43 -0700
Plz tell how to programme bluetooth automatic letter box notifier using arudino uno board,330ohm resitor and ldr.
Comment by Md . mohaiminul Islam on 2017-12-09 22:41:18 -0700
I used your app and and Arduino sketch . But I used Bluetooth Module HC-05 . Your app was sending data to Arduino and LED was turning on and off . But Arduino was not sending anything to your app . No data was received at android . Can you help ?
Comment by Diswel khriam on 2018-11-08 17:23:34 -0700
sir, help me to send commands to peripherals from user(mobile/PC) via bluetooth.