After testing the basic Wi-Fi connectivity options of the ESP8266 it is now time to explore some of the more interesting features of the chip. In the sketch below the NodeMCU development board creates a Wi-Fi access point and starts a web-server. A HTML page hosted on the web-server displays analog data from a photocell and allows you to control remotely a LED via Wi-Fi from a web-browser on your phone or PC. As in the previous examples, I am using the Arduino IDE to program the ESP8266 board.
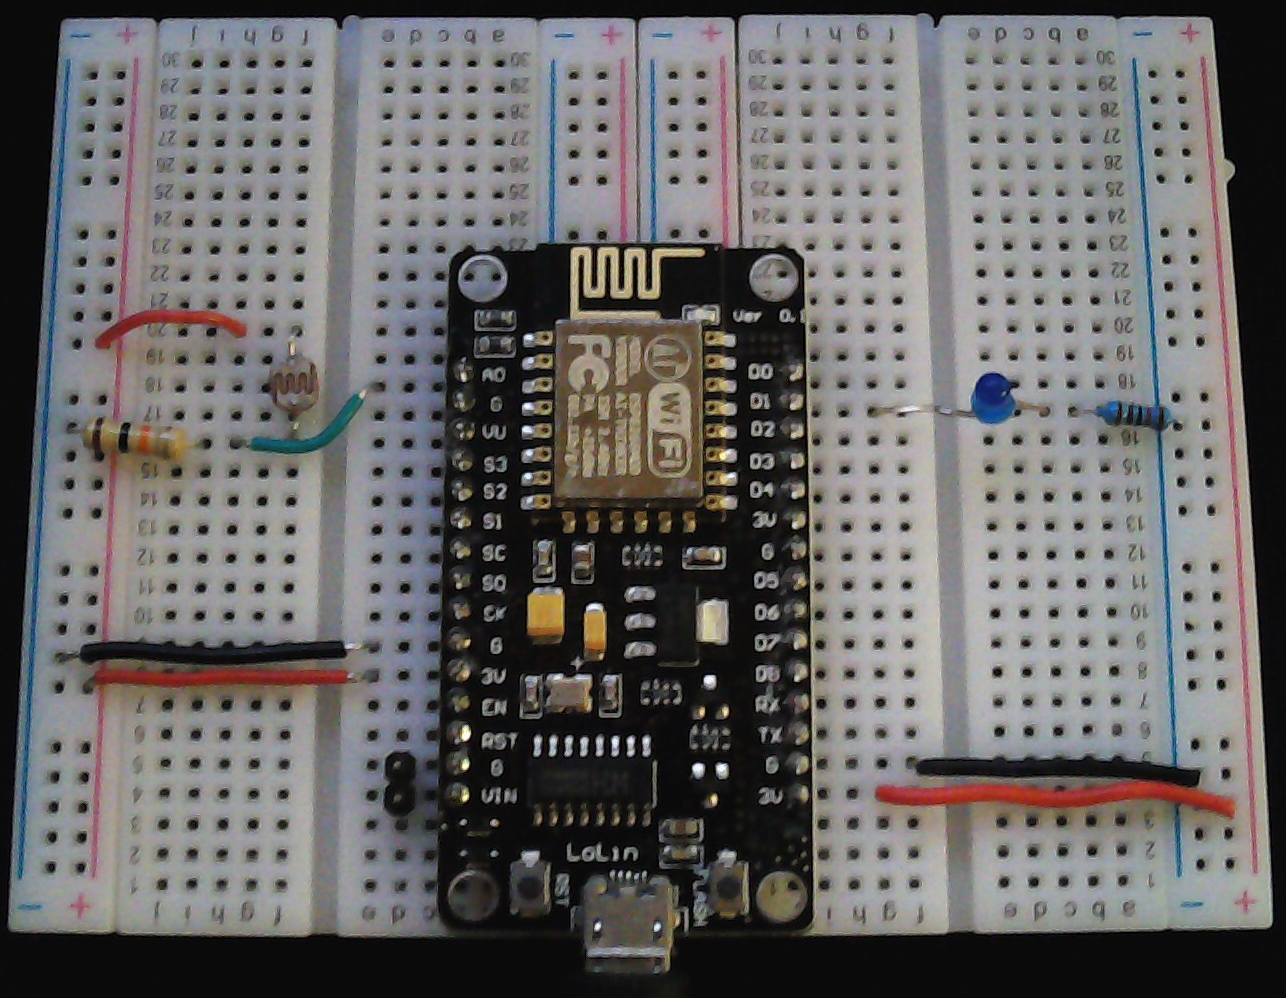
The LED is connected to NodeMCU pin D1 (ESP8266 GPIO5) through a 1k resistor. One leg of the photocell is connected to 3.3v and the other one to ground trough a fixed 10k Ohm (or higher) resistor. There is also a connection from the NodeMCU pin A0 (ESP8266 ADC0) to the point between the fixed pull-down resistor and the variable photocell resistor.
And here is the sketch:
Load the sketch, open the serial monitor and restart your NodeMCU module. You should see the following output:
Configuring access point...
AP IP address: 42.42.42.42
HTTP server started
Now open the Wi-Fi settings of your phone, or PC. You should see a new Wi-Fi network, called “ESP8266” (assuming you left the defaults in the sketch above). Connect to it using the password from the sketch, open a new browser window and type http://42.42.42.42 in the address bar. This is the static IP we defined earlier in the sketch for the root of the web-server. You should see a page like the one below:
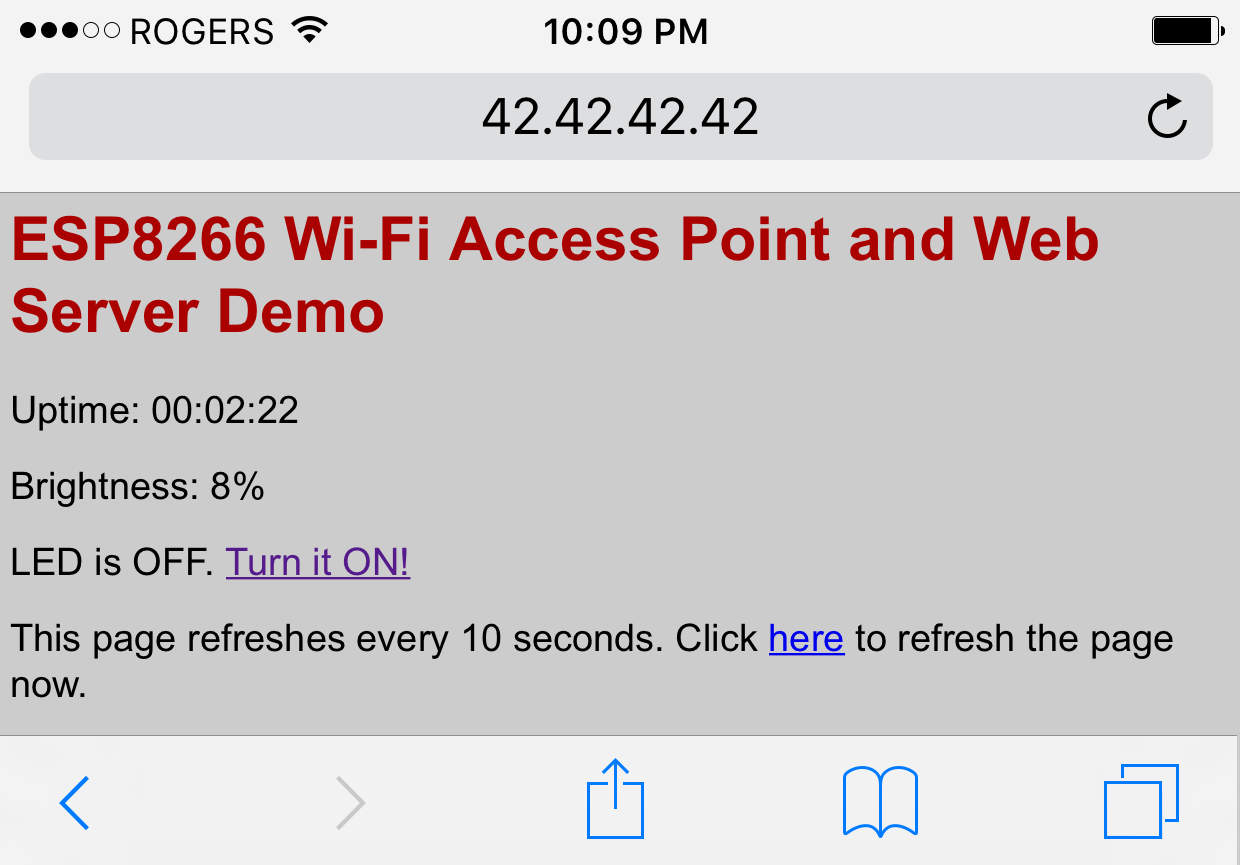
You can click on the link to toggle the LED now: the page should refresh and the LED should respond to your command!
Comments
Comment by gastone on 2017-10-14 06:30:57 -0700
Hi,
I’m starting to use ESP8266 and I’ve been very useful for your example thank you. I do not know HTML so I wonder if, once connected to the module, I can set ssid and password in the memory of the module itself by introducing this data into the edited web page.
Thanks
Comment by Matt Brunton on 2017-10-29 13:32:06 -0700
Great tutorial, code worked first time. Thanks!
Comment by Huw Roberts on 2017-11-07 05:15:04 -0700
I love people that say Great and work first time; however I found it will not compile reason being in line 1 @ the end ” */” as you have it at line 3, because of that line 2 does not compile.
Of course with me I got the web server working as per your example but in terminal mode “Arduino” what is all the rubbish text before displaying Configuring access point…
AP IP address: 42.42.42.42
HTTP server started
Is it just junk when you reset the 8266 noise configuring registers etc.
I haven’t manage yet to get the led to blink either way round but I must say this is lovely work by yourself. It gives an insight to what I want to do. Many thanks but please delete that */ and its perfect.
Comment by Les Wood on 2018-02-20 01:45:21 -0700
Great tutorial – worked first time. Couple of points:
Chrome rejects http://42.42.42.42 and brings up a search page. Works fine with firefox.
The page does not automatically refresh. In fact it goes and stays blank when one toggles the LED and one needs to “manually” refresh the page.
Regards
Les
Comment by Saif Ali Khan on 2018-03-21 23:07:26 -0700
Please tell me that if I add some javascript code and verify it, it give error
Comment by michael on 2018-05-03 07:46:59 -0700
I want to control two led can you help me to add codes of another led in the same sketch and send it to me through this email [email protected].i’ll be grateful
Comment by John Douglas on 2018-06-26 22:46:02 -0700
I am getting this error: “missing terminating ” character” at line 133 “,. I’m fairly new at this although I do know HTML5.
Comment by bhavik on 2018-07-20 15:57:39 -0700
how can i send data from webpage like textbox to the nodemcu
Comment by Tony Reed on 2018-07-28 04:07:16 -0700
Great tutorial, worked first time. Refresh and LDR brightness perfect, thanks
Comment by Jude on 2018-09-12 13:09:47 -0700
I would like to use this sketch with the Adafruit Feather Huzzah with ESP8266. However, I’m not sure what changes need to be done to make it compatible. Any advice?
Comment by Carrot on 2018-09-22 13:58:42 -0700
Thank you for the answer to life, the universe and everything! 😉
At last I manage to change annoyed 192.168.4.1!
Comment by pavlos on 2018-11-22 06:20:41 -0700
I’m not getting the http://42.42.42.42 you mentioned.
I get an ip which is within my network. I can access using 10.0.0.44
06:11:01.070 -> SDK:2.2.1(cfd48f3)/Core:2.4.2/lwIP:2.0.3(STABLE-2_0_3_RELEASE/glue:arduino-2.4.1-13-g163bb82)/BearSSL:6d1cefc
06:11:01.070 ->
06:11:01.070 -> Configuring access point…
bcn 0
06:11:02.888 -> del if1
06:11:02.888 -> pm open,type:2 0
06:11:02.888 -> add if1
06:11:02.888 -> pm close 7
06:11:02.888 -> dhcp server start:(ip:42.42.42.42,mask:255.255.255.0,gw:42.42.42.42)
06:11:02.888 -> bcn 100
06:11:02.888 -> AP IP address: 42.42.42.42
06:11:02.888 -> HTTP server started
ip:10.0.0.44,mask:255.255.255.0,gw:10.0.0.1
Comment by guillermo on 2018-12-02 08:41:05 -0700
Great tutorial, worked first time. Thanks
Comment by kim on 2019-01-18 04:25:34 -0700
Great tutorial, worked first time. Thank you.
Comment by Jamshid on 2019-02-09 09:38:18 -0700
Hi,
Thanks for your help. I uploaded the above code and created an access point with web server on it successfully. Now, if I want to send some commands remotely via WiFi, e.g. sending commands or data from my distant laptop/phone to the arduino/ESP8266 in order to control the sensors, what should I do?
Best, Jamshid
Comment by Chris on 2019-04-02 11:31:58 -0700
Hi
Just what I looking for, a foot up to finding out about ESP8266 control over the net. Thank you.
Tried to compile the sketch as it is but got an error on this line
IPAddress apIP(42.42.42.42); // Defining a static IP address: local & gateway
// Default IP in AP mode is 192.168.4.1
The error says ;
exit status 1
too many decimal points in number
Any ideas?
Thanks again for your tutorial.
Comment by PhilB on 2019-10-26 13:17:19 -0700
brilliant and clear – thanks
Comment by Fred on 2020-02-07 07:36:47 -0700
Hey,
Can you remove the below form your code? it does not compile 🙂 Outta help people….
** For more details see http://42bots.com.
*/
Comment by Marek on 2021-02-04 06:40:21 -0700
Hi – but PIR consumes 50uA – this device 3 mA, so not so easy to replace PIR in some cases.
Comment by David on 2023-08-31 18:12:49 -0700
Necroposting here, but 42.42.42.42 is a valid IP address on the internet. It should never be used on a home network even in .
Ideally the network address should be something in one of the address banks reserved for local networks like 192.168.x.x or 172.(16-31).x.x or 10.x.x.x (where x can be anything from 0-255)
Comment by Kevan Wells on 2024-05-03 11:21:18 -0700
Excellent tutorial although pressing ‘TURN it ON!’ has no effect on the phone screen or the LED?
Comment by Kevan Wells on 2024-05-04 06:56:57 -0700
Great tutorial for anyone starting with ESP8266, as the example worked on ‘WeMos D1’ provided ledPin = D2 or higher.