Programming ATtiny ICs with Arduino Uno and the Arduino IDE 1.6.4 or above
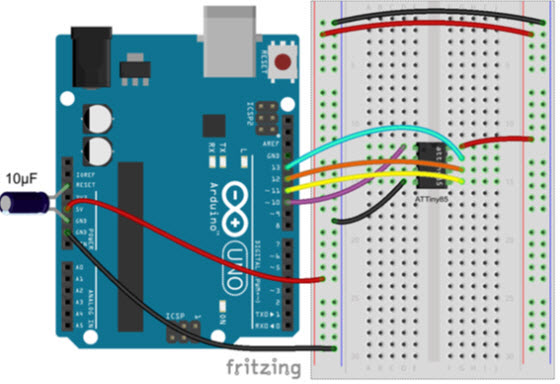
In previous posts I covered the steps on programming ATtiny85 and ATtiny84 chips using an Arduino Uno as programmer and the Arduino IDE Software with two different “libraries”. At that time the process of adding new boards to the Arduino IDE was fairly complicated and manual. As of version 1.6.4 of the Arduino IDE, the “Boards Manager” has been added, which makes adding third party boards (like the ATtiny) much easier. The awesome guys at the MIT Labs High-Low tech group have created the required file for the ATtiny ICS (ATtiny85, 45, 84 and 44) and provided installation instructions on their site. The video tutorial below covers the steps from setting up the Arduinp IDE and configuring the Arduino Uno to act as a programmer, through wiring the ATtiny to the Arduino, uploading a test sketch (“blink”, of course) and configuring the ATtiny to use its internal 8 Mhz clock.
The URL for the ATtiny bords file is below:
https://raw.githubusercontent.com/damellis/attiny/ide-1.6.x-boards-manager/package_damellis_attiny_index.json
Here is a alist of other contributed files that will allow you to add more boards to the Arduino IDE:
https://github.com/arduino/Arduino/wiki/Unofficial-list-of-3rd-party-boards-support-urls
What of I want to use the 20MHz option on an attiny84, do I then need an external clock to program it? How would this be wired on e.g. a breadboard?
Yes, you will need an external resonator / oscillator .
Now its time to test. Remove all connections from Arduino and take a power source. Here I will use a button cell to power ATtiny85.